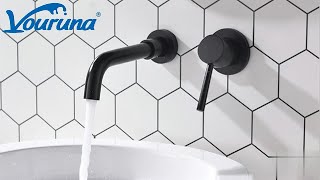
How to install wall mounted basin faucet? 2 hole wall-mount bathroom sink tap Installation Guide |

|
|
Buy it now:
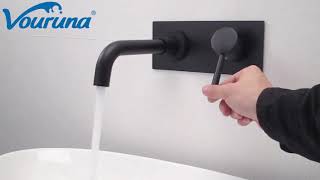
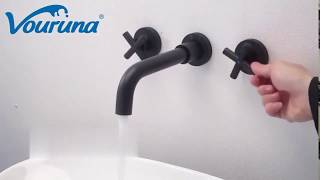
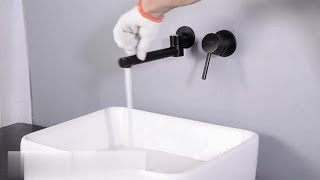
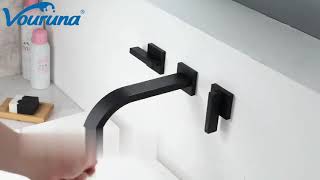
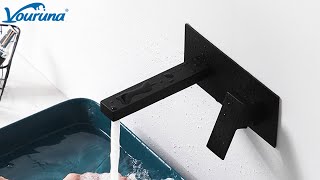
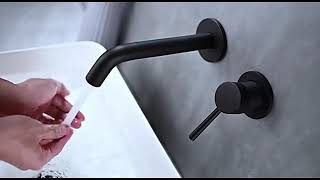
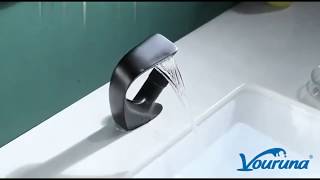
https://www.aliexpress.com/item/32812023303.html We are original faucet Factory/Supplier/Manufacturer, support drop-shipping, wholesale, OEM&ODM one-stop-solution. VOURUNA Matte Black Basin Faucet Wall Mounted Bathroom Tap Vessel Sink Wall Spout & Mixer Combination ♛Wall mount bathroom faucet will work well on vessel sinks, wall hung sinks, or under mount sinks in your bathroom as you do not need to drill any hole on the sink. You will make your bathroom look antique using this kind of faucet. You need the right installation on your bathroom. The right installation will make the spout to reach the center of the sink basin above the drain. Thus you need to understand this and confirm the contractor your wish upon the mounted faucet in your bathroom. #howtoinstallwallfaucet #wallfaucet #bathroomfaucet #faucetfactory #faucetshipdropping #faucetinstallationguide #blackwallfaucet #blackbasinfaucet ♛Single lever wall mounted 2 hole basin mixer is designed using high quality components and offers smooth styling. It features a cylindrical down swept spout with a separate round single lever control for easy mixing, is ideal for wall mounting above basins and is supplied with high quality fixings. ♛offers a modern cylindrical shaped design ideal for basins without pre-drilled holes. It features the latest ceramic disc technology with an easy to use round shaped handle, is manufactured from solid brass and is suitable to use with all plumbing systems. ♛Key Features Twin oval handles Ceramic disc technology Water save technology Smooth flat top spout Wide tip Suitable for low pressure (Minimum 0.2 bar required) black finish Ideal for wall mounting above basins without predrilled holes Important Information This product has been fully tested prior to it leaving the factory. In some cases you may find water residue on the parts. PLEASE MAKE SURE YOU FULLY TEST YOUR PRODUCT BEFORE TILING ETC. WE WILL NOT BE RESPONSIBLE FOR ANY COSTS INVOLVED IN REMOVAL OF THE TAP IF YOU FIND THERE IS A FAULT. To ensure you get the best use from this product, please read this installation guide thoroughly. This product has been designed for wall mounting. The product is suitable for use on all boiler systems including pumped, gravity and combination boilers to a maximum pressure of 5 bar. Pressure above this may require the fitting of reducer valves. We recommend that a fully qualified plumber install this product. If you experience any difficulty with the installation or operation of this system, please refer to the Troubleshooting guide. Tap Contents 1. Main tap body x 1 2. Cover plate x 2 3. Spout x 1 4. Lever x 1 Installation Before installation, please make sure your system is suitable. • Mark the position of the valve and fix it in place using the screws provided. • Connect the spout to the valve using your own pipework • Connect the hot and cold water feeds. • Carefully slide the back plate over the lever section without scratching it. • Carefully slide the back plate of the spout without scratching it. • Put the lever on and screw it tight Maintenance and Care This product is finished to a high standard. For cleaning, please use a damp cloth. No abrasive cleaning materials should be used. Any misuse will invalidate your guarantee. Troubleshooting Fault: Hot is coming out when I select cold or vise versa Cause: Hot and cold pipes are connected the wrong way around Fault: Leak from the lever Cause: Cartridge has become loose during installation. See below on how to fix. Fault: Fluctuating Flow Rate: Cause: Possible blockage in the system or operating conditions is incorrect Fault: Low or no flow from the valve Cause: Possible blockage in the system, operating conditions is incorrect or there is a blockage in the system. How to tighten the cartridge Remove the small cap from the lever and unscrew the lever using the Allen key provided. Remove the lever and put it aside. Remove the dome shaped part. Unscrew this with your hand and put it aside. Tighten the brass nut under the dome part. This will stop the leak and create the seal. Now you need to put the tap back together. How to replace the cartridge Remove the small cap from the lever and unscrew the lever using the Allen key provided. Remove the lever and put it aside. Remove the dome shaped part. Unscrew this with your hand and put it aside. Unscrew and remove brass nut under the dome part. Lift out the cartridge and replace with the new one. Now you need to put the tap back together. |